JS Aerial Blog
The Drone Blog

If you've ever tried to shoot aerial footage with a drone, you may have encountered the issue of drone shadows appearing in your footage. These shadows can be distracting and take away from the overall quality of your video. Fortunately, with the help of Adobe After Effects, removing drone shadows is a quick and easy fix. In this tutorial video, we walk you through the steps to remove a drone shadow from your footage using After Effects' Content Aware Fill feature. With just a few clicks, you can eliminate any unwanted shadows and have a polished final product. Whether you're a professional filmmaker or a drone hobbyist, knowing how to remove drone shadows in post-production can significantly enhance the quality of your aerial footage. Don't let shadows ruin your shots – give our tutorial a watch and start improving your drone videos today! If you found this tutorial helpful, be sure to check out our other video tutorials on our channel. We're always exploring new techniques and tools to help you create stunning visuals.

Table of Contents Safety Insurance Knowledge and Equipment Flight Planning and Risk Assessments Law Compliance Why a Good Drone Operator Costs So Much The Cost of Experience Why Risk It? 10 tips for hiring the right drone Op Aerial photography and videography have become increasingly popular in various fields, such as real estate, construction, and film production. Drone technology has made it possible to capture stunning visuals from a unique perspective, adding an extra dimension to any project. However, choosing the right drone operator for the job is crucial. While it may be tempting to opt for a cheaper option, there are many reasons why investing in a professional drone operator is worth the cost. In this blog post, we'll explore the benefits of hiring a skilled and experienced drone operator, such as their knowledge of safety protocols, equipment, and flight planning. So, if you're considering using drone technology for your next project, buckle up, and let's explore why investing in a good drone operator is a smart choice. Safety One of the most important reasons to choose a quality drone operator is safety. Drones can pose a potential risk to people and property if not operated correctly. A professional drone operator will have the necessary training and experience to ensure safe operation of the drone. They will also have a thorough understanding of airspace regulations, weather conditions, and other factors that could impact the safety of the flight. Insurance Even the most skilled drone operator can have accidents. That's why a good drone operator will have liability insurance to cover any potential damage or injury. Cheaper operators may not have insurance, which means you could be liable for any damages or injuries that occur during the shoot. Knowledge and Equipment A good drone operator has experience and knowledge of the latest drone technology and equipment. Cheaper operators may lack the necessary knowledge or may use inadequate equipment, leading to subpar results. A good drone operator will also have backup equipment in case of a malfunction, ensuring the shoot goes as planned. Flight Planning and Risk Assessments There is nothing worse than having a drone operator turn up on site who has not checked for flight restrictions in the area and then not being able to take off. A good drone operator will conduct a comprehensive risk assessments and flight planning before the shoot. This includes checking for flight restrictions in the area, as well as identifying potential hazards like trees, buildings, and power lines. Cheaper operators may not conduct a proper risk assessment or flight planning, leading to delays and potential hazards. Law Compliance Drone laws and regulations can vary by location, and a good drone operator will be up-to-date on the latest regulations and obtain any necessary permissions or authorisations. Cheaper operators may not be aware of or may not comply with local restrictions, leading to legal issues and fines. Why a Good Drone Operator Costs So Much The cost of hiring a good drone operator may seem high, but it is necessary for quality results and safety. Here are some reasons why a good drone operator costs so much: Limited Flying Days in a Year : It's important to consider that drone operators who charge very low prices for their services may not be full-time professionals. Keep in mind that weather conditions and other factors can limit the number of days a drone can fly in a year, reducing the opportunities for a drone operator to work. A professional operator has to account for this and charge accordingly to make a living. Insurance Costs: Liability insurance for drone operations can be expensive, but it is necessary to protect against potential accidents and injuries. Training Costs : A good drone operator will have completed the necessary training and certification to ensure safe and effective operation. This can cost £1000’s of per year. Equipment Costs : When considering a drone operator, it's crucial to understand that their equipment costs can be significant. Drone technology and camera equipment can be expensive, and a professional drone operator will have invested heavily in the latest and most advanced equipment to produce high-quality footage. This investment ensures that they can deliver excellent results, even in challenging conditions. A good drone operator knows that the right equipment can make all the difference in capturing stunning aerial footage. They stay up to date with the latest developments in drone technology and camera equipment, and they invest in the best tools to help them achieve the desired results. By choosing a drone operator who uses high-quality equipment, clients can be assured of receiving the best possible results. Maintenance Costs : Drones require regular maintenance and repairs, which can add to the cost of operating a drone business. The Cost of Experience : The cost of experience is an important factor to consider when choosing a drone operator. A good operator will have years of experience in the industry, which means they have honed their skills over time and have a better understanding of how to operate drones in various environments and conditions. With this experience comes knowledge of best practices, such as maintaining a safe distance from people and property, understanding the limits of the equipment, and capturing the best possible shots. Having a skilled and experienced drone operator also means they can handle unexpected situations that may arise during a shoot. They can adapt to changing weather conditions, adjust camera settings on the fly, and improvise solutions to problems that arise. This kind of experience cannot be bought or learned overnight, and it's worth the investment to ensure quality results and safe operation. It's important to note that experience may come with a higher price tag. However, this cost is justified when considering the potential risks and costs of hiring a cheaper, less experienced operator. Investing in an experienced drone operator is an investment in the success and safety of your project. Why Risk It? Choosing a cheap drone operator may seem like a smart move, but it can lead to poor quality results, safety issues, and potential legal problems. It's worth investing in a good drone operator who prioritizes safety, has the necessary knowledge and equipment, conducts proper flight planning and risk assessments, and complies with local regulations. While the cost may be higher, it's a worthwhile investment for quality results and peace of mind. So, why risk it? Choose a good drone operator and enjoy stunning aerial footage without the stress and worry. Here are 10 tips on hiring the right drone op for your project... Check if the drone operator is certified by the Civil Aviation Authority (CAA). This ensures that they are trained and qualified to operate drones safely and legally. Look at the operator's portfolio and examples of previous work to ensure that they have experience in the specific type of drone operation you require. Check if the drone operator has appropriate insurance coverage for their equipment and services. Ensure that the drone operator has a clear understanding of your requirements and the scope of the project. Discuss the details of the project with the drone operator to ensure that they have the right equipment and technology to meet your needs. Check the drone operator's reputation by reading reviews and feedback from previous clients. Discuss the timeline and budget of the project with the drone operator to ensure that they can deliver within your timeframe and budget. Ask the drone operator about their safety measures and protocols to ensure that they prioritize safety during their operations. Check if the drone operator has any additional certifications or qualifications that may be relevant to your project. Finally, make sure that you have a clear contract in place with the drone operator that outlines the scope of work, payment terms, and any other relevant details to avoid any misunderstandings.

Building a DJI digital FPV drone can be a challenging yet rewarding experience for drone enthusiasts. With the right equipment and some basic knowledge, you can build your very own high-quality drone that delivers seamless and immersive FPV experiences. In this step-by-step guide, we will walk you through the process of building a digital FPV drone. Prepare Your Equipment To build a digital FPV drone, you will need the following equipment: I will be using these parts in this tutorial. These are affiliate links, when you make a purchase using these links, it doesn’t cost you anything extra, and I will receive a small commission which will help keep this blog going. TBS Source One V5 Frame - https://amzn.to/3Ti9FCg Diatone MAMBA MK4 F722 APP flight controller stack Iflight Xing E Pro 2207 1800kv motors - https://amzn.to/3TkTzb3 Runcam link Wasp kit - https://amzn.to/3JbU16U HQ 5×4.3×3 V2S props - https://amzn.to/3Je7H1c Soldering iron - https://amzn.to/3ZRIcd7 TPU parts (optional) : bumpers, GoPro mounts, arm bumpers and guards, available on eBay or Etsy. We recommend using a high-quality soldering iron to ensure your connections are secure. One option is the Weller WLC100 40-Watt Soldering Station. You will also need the following tools and supplies when building an FPV drone: Soldering Iron and solder Hex screwdrivers set A small Phillips head screwdriver A pair of scissors for stripping and cutting wires Electrical tape 3M double sided foam tape Digital multimeter A load of 2mm wide zip ties (ideally 15cm or longer,) Cloth tape (15mm is a good width, great for wrapping motor wires but can be replaced by electrical tape, buy from Amazon) Frame I opted to use the latest Source One V5 frame for this build, not only because of its affordability, but also because it's an open-source frame that has been continuously improved by the community over the years to meet the latest hardware requirements. In my opinion, the TBS Source One V5 frame is a great choice for building a digital FPV drone, and you can check out my review of it below. Another exciting feature of the Source One is the plethora of free 3D printing designs available on Ebay and Etsy that can be used to enhance the frame. FC and ESC I prefer going for an "FC stack" that includes a flight controller board and a 4in1 ESC board as it requires minimal soldering, is mostly plug-and-play, and provides a seamless experience. That's why I opted for the Diatone MAMBA MK4 F722 APP flight controller stack, which is currently one of the most cost-effective options available in the market (as of March 2023). It's loaded with features such as built-in Bluetooth for Betaflight configuration from your phone, making it an excellent choice. Motors Nowadays, motors with a similar size tend to have comparable performance, with the build quality being the main differentiator. When selecting motors for a 5" FPV drone, options such as 2306, 2207, and 2208 are all suitable. I decided to go with 2207 due to its perfect balance of power and efficiency. DJI Digital System I have gone for the Runcam Link wasp kit for my build but you could use the Caddx Vista Polar or similar. This is a DJI Digital System build and you will also need the DJI Goggle V2 or the new Goggles 2 and the DJI Original FPV remote. Another important factor to consider is the motor KV. For this build, I opted for 1800KV since I plan to use a 6S LiPo battery. KV ranges between 1600-1900 are typically used for 6S batteries, and a higher KV provides a more aggressive and power-hungry experience. Additionally, 4S batteries are also a popular option. DJI Digital System I have gone for the Runcam Link wasp kit for my build but you could use the Caddx Vista Polar or similar. This is a DJI Digital System build and you will also need the DJI Goggle V2 or the new Goggles 2 and the DJI Original FPV remote. Another important factor to consider is the motor KV. For this build, I opted for 1800KV since I plan to use a 6S LiPo battery. KV ranges between 1600-1900 are typically used for 6S batteries, and a higher KV provides a more aggressive and power-hungry experience. Additionally, 4S batteries are also a popular option. Make sure you get a Micro Camera not Nano other wise you will need to buy an adapter! Assemble the Frame Begin by assembling the frame of your drone. This involves attaching the arms to the main body and securing them in place with the included screws. Make sure to attach the arms in the correct orientation and to tighten the screws firmly. This will ensure that your drone is stable and reliable in flight. Install the Flight Controller and ESC Next, install the flight controller and electronic speed controller (ESC) onto the frame. Follow the manufacturer's instructions to connect the ESC to the flight controller, and make sure to orient the flight controller in the correct direction. This will ensure that your drone is able to fly in the correct direction and respond to your control inputs. You will need to solder the included XT60 connector together with the wires and then solder them to the FC and you will also need to solder the Provided Capacitor to the same terminals as the XT60 lead. Make sure you solder the Red (Positive) and Black (negative) wire to the correct terminals Install the Motors Install the motors onto the arms of the frame. The motor wires should be facing towards the center of the frame, and the motors should be installed in the correct orientation. Secure the motors in place with the included screws. Make sure to tighten the screws firmly to prevent any looseness that may cause issues during flight. You can then solder the motor wires to the FC. Ideally solder them in the same order to the FC but it doesn’t really matter as you can just configure the motors to spin the correct way in Betaflight but it just makes your life easier in the long run. Testing ESC and Motors It's time to put your build to the test by plugging in a LiPo battery for the first time! However, before you do that, it's important to check for continuity to prevent any electrical shorts. To do this, use a multimeter in continuity mode and touch the probes to the positive and negative terminals of the XT60 or directly on the solder pads. If the multimeter beeps continuously, there's a short circuit that needs to be addressed before proceeding. One common cause of short circuits is excessive solder on one pad that may have spilled over onto neighboring pads. If the multimeter beeps for a split second and then stops, it could be due to the capacitors charging up when you touch the probes to the pads. This is normal and shouldn't be a problem if the beep doesn't continue. It's highly recommended to use a smoke stopper for the first time plugging in a battery to avoid any damage to your components. This simple device is a worthy investment that could save you from releasing the dreaded "magic smoke"! Once you've connected the battery and USB cable to the flight controller, go to the Motors tab in Betaflight Configurator and spin up the motors one by one to verify if they're spinning in the correct direction. If not, you can change the motor order and directions inside Betaflight Configurator, eliminating the need to do so in BLHeliSuite and resource remapping in CLI. If you encounter any issues, such as motors not spinning at all or only one not working, check if the battery is connected, the ESC beeped when the battery was plugged in, and if the ESC is receiving a signal from the FC. You can also try swapping a working motor with the possibly faulty one to narrow down the issue. Install the Runcam Link Wasp Kit Install the Runcam Link Wasp kit onto the frame. This kit includes the camera and the digital video transmitter (VTX), which is compatible with the DJI Digital FPV System. Secure the camera onto the designated spot on the frame and attach the VTX to the back of the camera. Use zip ties or a TPU mount to keep the VTX in place. Make sure to route the antenna away from the carbon fiber frame to avoid interference. The Runcam Link Wasp kit is an essential component for achieving high-quality digital video transmission, which is a key feature of a digital FPV drone. Pair the Runcam Link Wasp with the DJI Goggles V2 and Remote Controller To use the DJI Digital FPV System, you will need to pair the Runcam Link Wasp with the DJI Goggles V2 and Remote Controller. The process of pairing can be different depending on the specific equipment you are using, but there are plenty of tutorials available on YouTube to guide you through the process. Just search for "pairing Runcam Link Wasp with DJI Goggles V2 and Remote Controller" and you should be able to find helpful videos. Once paired, you will be able to enjoy high-quality digital video transmission and a seamless FPV experience. Configure Betaflight Once everything is connected, you will need to configure Betaflight, the software that controls your drone. Connect the flight controller to your computer using a USB cable, and use the Betaflight software to adjust the settings and calibrate your drone. This step can be complex and may require some research, so don't be afraid to seek out online tutorials and With these steps completed, your digital FPV drone should be ready to fly! Ensure to take safety precautions when flying and to keep improving your skills as a drone pilot.

GoPro Hero 11 Review: A New Standard for FPV Drone Footage GET IT HERE! https://amzn.to/3l4UAYh The GoPro Hero 11 is the latest addition to the GoPro Hero line of action cameras, and it's already making waves in the FPV drone community. With improved features and a more powerful sensor, the Hero 11 is setting a new standard for the quality of FPV drone footage. Specs Let's take a look at some of the key specs of the GoPro Hero 11: New larger 1/1.9″ Sensor 8:7 aspect ratio Automatic Highlight Videos 10-Bit Colour (finally!) HyperSmooth 5.0 + 360 Degree Horizon Lock 27 megapixel still images HyperView Up to 5.3k TimeWarp 3.0 Night Effects (we love this) Enduro Battery Frame grabs – 27MP from 5.3K 8:7 video 5.3K 60fps 4K 120fps 2.7K 240fps for 8x slo-mo 33 feet (10m) waterproof straight out of the box Voice control LCD full-colour front display LCD full-colour real screen 1080p Livestream and Webcam with HyperSmooth 5.0 video stabilization RAW Photos in all modes Optional modular accessories such as Max Lens Mod, Media Mod, Light Mod and Display Mod Performance Sensor and Aspect Ratio The larger 1/1.9″ sensor on the Hero 11 captures more light and delivers sharper images and videos compared to the Hero 10. The 8:7 aspect ratio is also a new addition that provides more vertical space in the footage, making it perfect for Instagram stories and TikTok videos. HyperSmooth 5.0 + 360 Degree Horizon Lock HyperSmooth 5.0 is the most advanced stabilization technology from GoPro to date, and it works like a charm on the Hero 11. The 360 Degree Horizon Lock ensures that the horizon stays level even when the camera is rotated. TimeWarp 3.0 TimeWarp 3.0 is an improved version of the popular TimeWarp feature on GoPro cameras, and it allows for even smoother time-lapse footage with a higher dynamic range. Night Effects The Hero 11 features new night effects that make low-light footage look incredible. The camera can capture vivid and colorful footage even in dark environments, making it ideal for nighttime FPV drone flights. Comparison to Hero 10 Sensor : The GoPro Hero 11 has a larger 1/1.9" sensor compared to the Hero 10, which means it can capture more detail and light for better image quality. Aspect ratio : The Hero 11 has a new 8:7 aspect ratio, while the Hero 10 has the standard 4:3 aspect ratio. HyperSmooth : The Hero 11 features HyperSmooth 5.0 with 360-degree horizon lock, while the Hero 10 has HyperSmooth 4.0. TimeWarp : The Hero 11 offers up to 5.3K TimeWarp 3.0, while the Hero 10 has up to 4K TimeWarp 2.0. Night effects : The Hero 11 has improved night effects, which means it can capture better low-light shots than the Hero 10. Frame grabs : The Hero 11 can capture 27MP still images from 5.3K 8:7 video, while the Hero 10 can only capture 15MP still images from 5K 4:3 video. Accessories : The Hero 11 has the option for modular accessories such as the Max Lens Mod, Media Mod, Light Mod, and Display Mod, which are not available for the Hero 10. Overall, the GoPro Hero 11 offers several improvements over the Hero 10, including a larger sensor, new aspect ratio, improved stabilization and time-lapse, better low-light performance, longer battery life, and more accessory options.While both cameras are powerful and capable of capturing high-quality footage, the GoPro Hero 11 offers several key upgrades over its predecessor. These include the larger sensor, automatic highlight videos, 10-bit color, HyperSmooth 5.0 with 360-degree horizon lock, and improved low-light performance with Night Effects. The Enduro battery is also a nice addition for longer recording sessions. On the other hand, the GoPro Hero 10 still has some standout features of its own, including the ability to shoot 5.3K video at 60fps and 4K at 120fps, as well as 2.7K at 240fps for slow-motion footage. The HyperSmooth 4.0 with horizon leveling is also impressive, as is the camera's 33-foot waterproof rating straight out of the box. Ultimately, the choice between the two will come down to personal preference and use case. If you prioritize the latest technology and improved low-light performance, the GoPro Hero 11 is the clear winner. However, if you're looking for a camera that can capture smooth, high-quality footage at high frame rates, the GoPro Hero 10 is still an excellent choice. HyperSmooth and TimeWarp The Hero 10 also has HyperSmooth 4.0, which is a slightly older version of the HyperSmooth technology. The TimeWarp feature on the Hero 10 is also not as advanced as the TimeWarp 3.0 on the Hero 11. Conclusion In conclusion, the GoPro Hero 11 is an exceptional camera for FPV drone enthusiasts and action sports lovers alike. With its improved features such as the larger sensor, automatic highlight videos, 10-bit color, HyperSmooth 5.0, and 360-degree horizon lock, it's sure to capture stunning footage that you'll be proud to share. Not only is it an excellent action camera, but the Hero 11 also boasts features that make it suitable for everyday use, such as its Enduro battery, voice control, and LCD full-color front and rear screens. If you're in the market for a new camera for your FPV drone, the GoPro Hero 11 should definitely be on your list. With its improved features and high-quality footage, it's sure to help take your flying experience to the next level.

Leisure centres are vibrant places, bustling with people of all ages and interests. With so much activity happening every day, it can be a challenge to showcase the full scope of what your centre has to offer. That's where internal FPV drone tours come in. These cutting-edge drones offer a new and exciting way to capture the essence of your leisure centre. With their ability to provide a first-person perspective, FPV drones can take viewers on a thrilling journey through your centre, highlighting everything from exercise classes and swimming pools to the latest gym equipment. So, what are the benefits of using internal FPV drone tours to showcase your leisure centre? 1. Showcase the full scope of your facilities: When people are looking for a new leisure centre to join, they want to know what they're getting themselves into. An FPV drone tour can provide them with an all-encompassing view of everything your centre has to offer, from the treadmills and free weights in the gym to the lap lanes and water slides in the pool. This unique perspective offers a comprehensive look at your facilities that goes beyond what traditional photography or videography can offer. 2. Create an immersive experience for viewers: FPV drone tours provide a unique and engaging way to showcase your leisure centre. By flying through your facilities, viewers can get a sense of what it's like to be there in person. This can be especially helpful for attracting new customers who may be hesitant to visit a leisure centre they're unfamiliar with. 3. Highlight specific features: FPV drone tours allow you to highlight specific features of your leisure centre in a way that's both informative and visually stunning. Whether it's a state-of-the-art piece of exercise equipment or a new group fitness class, an FPV drone tour can showcase these features in a way that's sure to capture attention. 4. Improve accessibility: An FPV drone tour can be a valuable tool for users who may have accessibility needs. By providing a virtual flythrough of your leisure centre, individuals with mobility or sensory impairments can get a sense of what your facilities have to offer and how they can navigate them. 5. Stand out from the competition: By using an FPV drone to showcase your leisure centre, you can differentiate yourself from the competition. This type of content is still relatively new, so by being an early adopter, you can position yourself as an industry leader. Overall, internal FPV drone tours provide a unique and engaging way to showcase your leisure centre. They allow you to highlight your facilities in a way that's both informative and visually stunning, and can help you stand out from the competition while also improving accessibility.

Are you looking for innovative ways to showcase your manufacturing facility? Have you considered using FPV drones for internal flythroughs? Not only can FPV drones provide a unique and immersive experience for potential customers and partners, but they can also improve safety and efficiency through inspections. In this blog post, we'll dive into the specific benefits of using FPV drones for internal flythroughs in manufacturing facilities, and how they can enhance your marketing efforts while also improving overall operations. 1. Marketing: With FPV drones, you can give potential customers and partners an immersive look at your facility. The high-quality footage captured by the drone's camera can highlight unique features and capabilities, providing a detailed and interactive experience that will set your facility apart. 2. Remote accessibility: FPV drones also make it possible to showcase your facility to international clients who may not be able to travel. This is particularly useful during times of travel restrictions, allowing potential customers and partners to explore your facility from anywhere in the world. 3. Increased engagement: By providing an interactive and dynamic experience, FPV drone flythroughs can increase engagement with your marketing content. This can lead to increased brand awareness and interest, ultimately translating into new customers and partnerships. 4. Inspections: FPV drones are also useful for inspections within manufacturing facilities. They can navigate tight spaces and capture high-quality footage, allowing you to inspect machinery, equipment, and other areas that may be difficult or dangerous for humans to access. This can help identify potential issues and prevent accidents, improving overall safety in the facility. In conclusion, FPV drones for internal flythroughs offer a unique and engaging way to showcase your manufacturing facility. Whether you're looking to attract new customers and partners, improve safety, or streamline inspections, these tools are a must-have for any modern manufacturing facility. Here is a fantastic FPV Drone Flythrough of the Tesla Giga factory in Berlin.

Ready to take to the skies with your own FPV drone but not sure how to get started? Don't worry! We've got you covered with some awesome ready-to-fly (RTF) FPV kits that are perfect for beginners. With everything you need included right out of the box, you can start flying in no time. In this post, we'll give you the lowdown on the best RTF FPV kits for beginners, so you can soar to new heights and capture epic footage from a whole new perspective. Get ready to experience the thrill of FPV flying! 1. DJI FPV Combo The DJI FPV Combo is a premium option for beginners who are willing to invest in a high-quality FPV drone. This kit includes the DJI FPV drone, remote controller, goggles, and all necessary accessories. The DJI FPV drone is equipped with a 4K camera and advanced features like obstacle avoidance, making it easy for beginners to fly and capture stunning aerial footage. Get it here! https://amzn.to/3T3PlED 2. EMAX Tinyhawk 2 RTF Kit The EMAX Tinyhawk 2 RTF Kit is a great option for beginners on a budget. This kit includes the Tinyhawk 2 drone, remote controller, and goggles. The Tinyhawk 2 is a small but powerful drone that is perfect for indoor and outdoor flying. It features a 600TVL camera and supports both 1S and 2S batteries, giving beginners the option to choose between longer flight times or more power. Get it here! https://amzn.to/3ZIVjgk 3. BETAFPV Cetus Drone Kit The kit comes with a special design of Cetus brushed whoop quadcopter, LiteRadio 2 SE, and VR02 FPV Goggles. Auxiliary flight function is suitable for novices, greatly reducing the threshold of operating, ready to fly, zero-entry barrier. 3 Flight Modes allow you to achieve from a beginner to a professional racer. Get it here! https://amzn.to/3YtKMEA 4. DJI Avata Pro-View Combo The DJI Avata Pro-View Combo is another great option for beginners looking for an RTF FPV kit. It comes with everything you need to get started, including a high-quality camera with a 5.8 GHz video transmitter, the motion controller, and the DJI Goggles 2. The DJI Avata also has a long battery life and a range of up to 7 km, making it ideal for exploring larger areas. Additionally, the Avata Pro-View Combo features a 4K camera, providing stable and smooth footage. While the DJI Avata is a bit pricier than some of the other options on this list, its advanced features and reliable performance make it a worthwhile investment for those serious about getting into FPV flying. Get it here! https://amzn.to/4245kH0 5. GEPRC TinyGO 4K FPV Whoop RTF Drone The GEPRC TinyGO 4K FPV Whoop RTF Drone is a great option for beginners looking for a small and easy-to-fly drone. This RTF drone comes fully assembled, making it a perfect choice for those who want to start flying right away without having to deal with the hassle of putting the drone together. The GEPRC TinyGO 4K FPV Whoop RTF Drone is equipped with a HD camera that captures high-quality footage and offers a first-person view for a more immersive flying experience. With its durable frame and powerful motors, this drone can handle crashes and bumps with ease, making it a reliable option for new pilots. Get it here! https://amzn.to/3mwvhyG ` Overall, a ready-to-fly FPV kit is a great way for beginners to get started in the world of FPV drones. These kits include everything you need to start flying right out of the box, and are designed to be easy to use and beginner-friendly. Whether you're looking for a budget option or a premium option, there's a ready-to-fly FPV kit out there that's perfect for you.
As a drone enthusiast, you know the importance of having a reliable and long-lasting battery for your FPV drone. Whether you're a professional racer or a casual hobbyist, the battery is the heart of your drone, powering your flights and determining the overall performance. In this article, we've compiled a list of the best 4S FPV drone batteries to help you get the most out of your drone flying experience. Tattu 4S 1550mAh LiPo Battery: This high-quality battery from Tattu is designed specifically for FPV racing and freestyle drones. With a capacity of 1550mAh and a 75C discharge rate, it delivers exceptional power and performance. The battery also comes with an XT60 connector and a balance plug, making it easy to charge and use. CNHL 4S 1500mAh LiPo Battery: The CNHL 4S 1500mAh battery is another excellent choice for FPV drone pilots. With a 100C discharge rate, it delivers plenty of power for aggressive flying, and the compact size makes it ideal for smaller drone frames. The battery also comes with an XT60 connector and a balance plug. Turnigy Graphene 4S 1300mAh LiPo Battery: The Turnigy Graphene battery is a popular choice among FPV pilots, thanks to its high discharge rate of 65C and long cycle life. It also has a compact size that makes it perfect for racing and freestyle drones, and it comes with an XT60 connector and a balance plug. Gens Ace 4S 1550mAh LiPo Battery: Gens Ace is a trusted brand in the world of drone batteries, and their 4S 1550mAh battery is no exception. With a 45C discharge rate and a lightweight design, it's an excellent choice for freestyle and racing drones. The battery also comes with an XT60 connector and a balance plug. Ovonic 4S 1550mAh LiPo Battery: The Ovonic 4S 1550mAh battery is a budget-friendly option that doesn't compromise on performance. With a 100C discharge rate, it's capable of delivering plenty of power for fast and aggressive flying. The battery also comes with an XT60 connector and a balance plug. In conclusion, choosing the right battery for your FPV drone is crucial for optimal performance and reliability. The batteries on our list are some of the best 4S FPV drone batteries on the market, providing the power and longevity you need to enjoy your flights to the fullest.

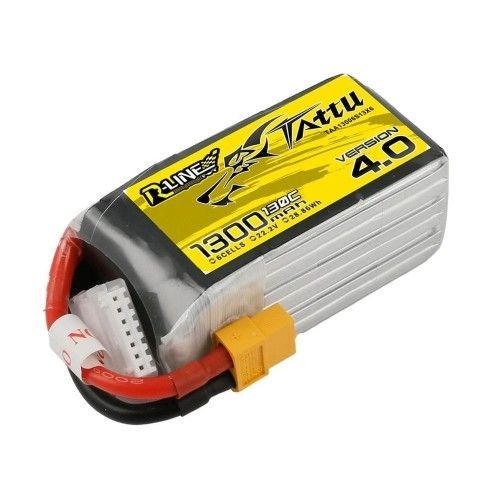
Flying an FPV drone is an exhilarating experience, but it’s also essential to have a reliable and long-lasting battery to ensure that you get the most out of your flights. 6s batteries are the perfect choice for those who want to power their FPV drones with a high voltage and maximize their performance. In this post, we’ll take a look at the best 6S FPV drone batteries currently available on the market. Tattu R-Line V4 1300mAh 6S 100C LiPo Battery The Tattu R-Line V4 1300mAh 6S 100C LiPo Battery is a top-performing battery that provides exceptional power and reliability. It features high-quality materials and a 100C discharge rate, making it perfect for high-performance racing drones. GNB 1300mAh 6S 110C LiPo Battery The GNB 1300mAh 6S 110C LiPo Battery is another great choice for FPV drone pilots who demand high performance. This battery has an impressive discharge rate of 110C, which translates to quick acceleration and sustained power output. CNHL Ministar 1300mAh 6S 100C LiPo Battery The CNHL Ministar 1300mAh 6S 100C LiPo Battery is a reliable and affordable battery option that still provides excellent performance. It has a 100C discharge rate and features high-quality materials that ensure consistent performance and long life. Acehe Formula 1500mAh 6S 95C LiPo Battery The Acehe Formula 1500mAh 6S 95C LiPo Battery is an excellent option for pilots who need a little more power and runtime. It features a 95C discharge rate and 1500mAh capacity, which makes it perfect for longer flights and more demanding maneuvers. RDQ Series 1500mAh 6S 100C LiPo Battery The RDQ Series 1500mAh 6S 100C LiPo Battery is another high-quality option that provides excellent performance and reliability. It features a 100C discharge rate and a 1500mAh capacity, which makes it suitable for high-speed flights and freestyle maneuvers. Tattu R-Line Version 3.0 1550mAh 6S 95C LiPo Battery The Tattu R-Line Version 3.0 1550mAh 6S 95C LiPo Battery is a durable and high-performing option that provides reliable power output. It has a 95C discharge rate and a 1550mAh capacity, which makes it perfect for high-speed racing and freestyle flights. In conclusion, choosing the right battery is crucial for maximizing your FPV drone's performance and flight time. Each of the batteries mentioned above is a top-performing option in its own right, and it's up to you to decide which one is best suited for your drone and flying style. Whether you're a high-speed racer or a freestyle enthusiast, there's a 6s FPV drone battery that's perfect for your needs.

Take Your Marketing to New Heights: Why FPV Drones are the Coolest Kid on the Block for Killer Content
Locations